
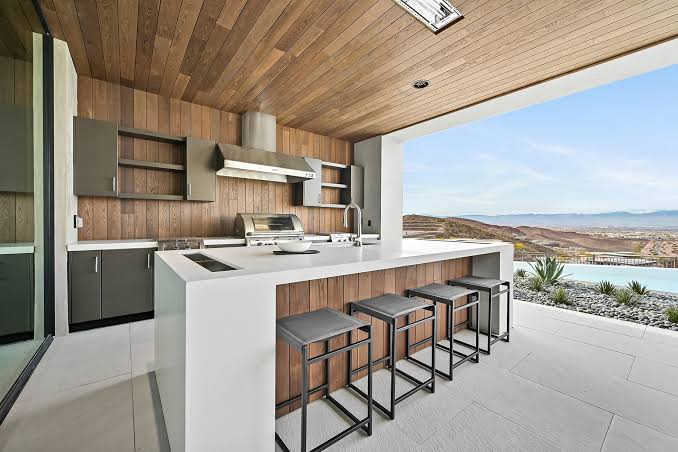
There’s a particular moment every grill enthusiast reaches: you’re juggling a tray of raw burgers in one hand and tongs in the other, and the kitchen is twenty steps away — twenty steps in the dark, past the sliding door, while the chicken chars. That’s the moment an outdoor kitchen island stops being a luxury and starts feeling like common sense.
Building one well is a project, not a purchase. Get the layout, materials, and utilities right up front and you’ll have a cooking space that serves you for a decade.
1. Start With the Layout: Zones, Not Appliances
A 36-inch grill, a side burner, and a fridge all sound great until they’re wedged into an island with no room to work. Professionals design around work zones instead: hot, cold, wet, and prep.
The hot zone holds your grill and burners. The prep zone is at least 24 inches of uninterrupted counter beside the grill. The wet zone covers the sink and trash pull-out; the cold zone is refrigeration and beverage storage. Arrange them in a rough arc or L-shape so one person moves between zones in two steps, not twelve.
Size the island to your actual patio
Measure your patio, then subtract generous walkways: 36 inches of clearance on working sides, 48 inches where doors swing or people pass behind the cook. Small patios do better with a straight galley run — grill at one end, prep at the other — than a cramped L-shape that eats walkway space.
2. Choose Materials That Survive Real Weather
Your island will face rain, UV, freeze-thaw cycles, and grease splatter. The frame and finishes decide whether it looks great in year five or crumbles in year two.
Frames: Galvanized steel stud framing is the professional standard — it won’t rot, warp, or invite termites the way wood can. Welded stainless frames are tougher still but pricier. Pressure-treated wood works on tight budgets, but only fully sheathed and sealed.
Cladding: Stone veneer gives the classic heavyweight look and shrugs off weather. Stucco is cheaper and easy to repaint. Marine-grade polymer panels are the low-maintenance newcomer — they look like painted cabinetry but never need resealing. Add a waterproof membrane behind any cladding; trapped moisture is the silent killer of outdoor structures.
Countertops: Poured concrete is affordable but needs sealing twice a year. Granite is nearly indestructible outdoors and handles hot pans without flinching. Tile tempts with its price — until grout lines fill with grease and a freeze cracks the run. For most builds, granite or a quality porcelain slab is the sweet spot.
When comparing pre-built options, a purpose-made outdoor kitchen island beats adapted indoor cabinetry — frame, finishes, and hardware rated for weather, which removes a whole category of expensive guesswork.
3. Plan Utilities Early: Gas, Water, and Electric
Utilities get expensive to fix later, so rough them in during construction even if you’re not hooking everything up on day one. Running a gas line after the stonework is finished can cost triple what it costs mid-build.
Gas
A natural gas line from your home’s supply is the gold standard: endless fuel, no tank swaps, lower running costs. It needs a licensed plumber and usually a permit — budget $500–$1,500 depending on the run. Otherwise, design a ventilated cabinet bay for a standard 20-pound propane tank with an easy-swap door. Never enclose a tank in a sealed compartment.
Water
A sink sounds like a luxury until you’ve carried your tenth pot of pasta water across the yard. A cold-water line is a simple plumb; adding hot costs more but brings real convenience. Check local code before you pour the slab — some areas allow a dry well for a prep sink, others require tying into the sewer.
Electric
You’ll need more outlets than you think: rotisserie motors, a fridge, lighting, phone chargers. Run a dedicated 20-amp GFCI circuit to the island (code requires GFCI protection outdoors) with weatherproof in-use covers. Low-voltage LED strips under the counter overhang draw almost no power and transform the island after dark.
4. Design Storage That Keeps Everything Within Reach
An island without smart storage is just a heavy table. The goal: every tool lives within arm’s reach of where it’s used, and everything stays dry.
Cabinetry must be genuinely weatherproof — stainless steel or marine-grade polymer with gasketed doors. Standard indoor-style cabinets will swell and stick within a season.
Zone storage to match your work zones: tools, rubs, and thermometers beside the hot zone; boards and bowls near prep; trash pull-outs in the wet zone. Add a paper-towel holder, bottle opener, and grill-brush hooks during the build — you’ll use them every cook.
5. Budget Honestly — Then Build in Phases
A fully loaded custom island runs $8,000–$25,000+, with the spread almost entirely in finishes and appliances: frame and cladding might be $2,000–$4,000, but granite, a premium grill head, and a sink push you toward five figures. Set your ceiling first, then allocate roughly: 30% structure and cladding, 40% appliances, 20% utilities and countertops, 10% contingency. You will use the contingency.
The smart move for most homeowners is a phased build. Phase one is the island structure with the grill installed and basic countertops — a complete, functional cooking station. Phase two adds the sink and water line. Phase three brings refrigeration, lighting upgrades, and nicer finishes. Design the island with capped utility stubs and empty cabinet bays from day one, and each later phase becomes a weekend project instead of a demolition.
If you want the professional core without the long timeline, a built-in grill island bundles the grill head, storage, and weather-rated construction into a single unit — and you can still phase the surrounding work (gas line, water, lighting) around it as the budget allows.
Conclusion
The ultimate outdoor kitchen island isn’t the biggest or the most expensive — it’s the one where everything is exactly where your hands expect it to be. Zone the layout before you shop, choose weather-rated materials, rough in every utility during the build, design storage around your cooking habits, and phase the project so the budget never forces a bad decision. Do that, and your patio becomes the place everyone gathers around.
